Sunday, February 27, 2011

Fiberglassing the outside of the bottom

February 27, 2011
I  took off the clamps and was pleased to see that the repair I did on the crack in the rail came out OK. I started sanding it, but the sandpaper on the belt sander ripped in half and I could do no more.  MaryAnn helped me flip the dory over again--each time it gets a little heavier. Then I started getting ready to fiberglass the bottom.  Using a hand saw, I cut off the the rails so that they were flush with transom. I sanded the whole bottom and the stem with the orbital sander.  I started laying out the fiberglass when I remembered that I needed masking tape along the bottom edge of plank two, and along the edge of the transom.  I also taped on each side of the stem. Then I laid the fiberglass out and trimmed it along the masking tape.  I was glad the tape was blue because it was easier to see the edges. Finally, I got to the exciting step of wetting the fiberglass with epoxy--I'm so impressed with the way the fiberglass becomes invisible (except for the texture) and how the epoxy brings out the color of the wood.

Masking the stem to get ready for the fiberglass.

Masking the transom to get ready for fiberglass.


Laying out the fiberglass and trimming it to the transom.

Laying out the fiberglass and trimming it to the stem.

Spreading epoxy on the fiberglass with a plastic putty knife.

Wetting the fiberglass with the epoxy.

Fiberglass on stem and bottom is wet with epoxy.

Fiberglass on the transom is wet with epoxy. Note that the rails are trimmed to match the transom.

Saturday, February 26, 2011

Fillets again

Repairing crack in rail with epoxy.

Rounding off the front.

Thwarts are sanded and templates are in place to trace the pattern.

Making the fillet larger on the transom.
February 25, 2011
When I took the clamps off I discovered that the rail I put on yesterday had cracked about five feet from the stern.  I added some thickened epoxy and put some clamps on it.  Hopefully, that will work because I don't know what else to do with it. Since I was mixing epoxy I decided to add to the fillets on either side of the transom next to the doubler.  I also added to the fillets on several of the bulkheads.  I'm still concerned that I still have two tubs of wood flour--maybe I didn't make the fillets thick enough.  Since I couldn't flip the dory over and work on fiberglassing the hull, I decided to round off the nose of the boat and filled in gaps with more epoxy.  I wasn't sure how to make the curve for the nose and then decided to just use the curve of the breast hook. I traced the curve onto a piece of paper and then cut it out.  Using the paper as a template, I drew it on the the rails where they came to together in the front, and then used the saber saw to cut it out.  I used my new belt sander to round things off.
I also sanded down the boards that I had glued together for the thwarts,  and then traced the pattern for the thwarts onto the boards.  Now I need to cut them out and I would like to use Dad's band saw.  Somehow I need to make enough space to do this, and then need to make sure the saw works because no one has used it in years.

Thursday, February 24, 2011

Gluing second rail to port side

February 24, 2011
To glue the final rail, I went through the same procedure one more time. I took off the clamps and then glued the second rail on the port side.  To not waste more time or epoxy  I also glued the small thwart together.

The second rail is added to the port side.

Once again I used cement blocks to keep the thwart flat on the table.

Wednesday, February 23, 2011

Pulling out wires - helpful forum tip

This post falls under the category, "Things I wish I had known".
In reading posts in the CLC Builder's forum, I discovered an easy way to pull out wires embedded in epoxy. For wires that are epoxied in, heat them with a small soldering iron and then you can pull them right out with pliers.  I've been trying to pull them with pliers but so far they just break off.  I was trying to figure out what to do with the wires that are still stuck.  Unfortunately, the wires are very short and almost flush with the hull.  Hopefully they there is enough left for me to grab on to them, because I want to try this tip.

Adding second rail to starboard side

February 23, 2011
I took off the clamps and got the second layer of the rail ready for the starboard side.  I picked up a few more clamps to be sure that we had plenty for this rail because some of the small clamps would not fit the new width of the rail.  I also realized that the space is getting tighter and tighter. Each layer of rail adds another inch and there isn't much room to walk around the dory.

The second rail is in place on the starboard side; one more rail to go.

Added the second rail to the starboard side.
I also glued the medium size thwart together.  When I took the clamps off the one I did yesterday, I realized the the clamps were so heavy that they pulled up on the thwart and now it has a slight curve.  Hopefully I can sand it flat.  This time I put blocks on the thwart to keep weight on it to make sure it was flat on the table.
To make sure the thwart is flat I added some weight.

Tuesday, February 22, 2011

Gluing port rail to dory

February 22, 2011
I took the clamps off the side I did yesterday and then glued the first layer of the rail on the other side.   I wish I had more clamps because I'm going to have to do the same thing two more times to finish this step.  But I'm too cheap to go out and buy another 30+ clamps.  The "Pony" spring clamps are definitely better than the other ones that I bought, but I think the C clamps work the best.  As we worked our way down the length of the boat, we alternated using the different types of clamps.  Some epoxy did squeeze out as we tried to make sure the rail was tight against the side of the dory.  The manual said not to tighten the clamps too much or the bond or we would lose too much epoxy.  It's had to know how much is too much, but the rail we put on yesterday seems OK.

First layer of port rail glued.
 I also started gluing the thwarts because I was going to have the same problem--I have only four clamps and will have to do them one at a time instead of all three at once. I love that CLC included different colors of wood to make them.

Long thwart glued.

Monday, February 21, 2011

Gluing starboard rail to dory

February 21, 2011
This morning I took the clamps off the rails.  For the most part the packing tape helped to make less of a mess, but I did have a couple of my scraps of wood stuck to the rail.  Fortunately, I was able to pry them off and then had to sand everything smooth. 

We flipped the dory back over and I mixed up some epoxy to a paste like consistency to put the rail on the dory.  I was hoping to do both rails but I had only enough clamps to do the starboard side.  I screwed the rail to the breast hook and then started adding clamps to work our way to the stern.

CLC says to always get more clamps and I can see why with this step. I had only enough clamps to do one side.  I went back over the joint between the rail and the edge of the dory with paper towels to clean up epoxy that was squeezed out with the clamps.

Bending the rail was not as difficult as I thought it would be, even though the rail is about an inch square. I've never built anything with curves like this, and it's cool to see how it all goes together. 
Even with all the clamps I had, there were only enough to do one side.

Sunday, February 20, 2011

Gluing the rails pieces together

February 20, 2011

Each of the rails are in three pieces and need to be epoxied together.  As I started to lay them out, I realized that the only space that was long enough to do the work was on the floor under the dory.  Using one of the shop tips from the web site, I put plastic packing tape along joint of the scarf to save on sanding off the extra epoxy later.  I also used scrap pieces of wood to protect the rails from the clamps.  I just hope there is no epoxy  in contact with these pieces. Otherwise I'll have a bigger mess than if I had just used the clamps directly on the rails.

Rails are glued together on the floor under the dory.

Saturday, February 19, 2011

Sanding planks at transom

February 19, 2011
The planks needed to be trimmed back to be flush with the transom.  I used a plane that I inherited from my father; I wonder if he got it from his father.  I'm of an age where I feel the connection with past generations, and tangible things like tools make the connection more real to me.  Anyway, I was pleased that it was in working order, but I really need to work on sharping the blade.  I bought a water stone, but now I need to put it to use.  After planing away the extra wood that extended beyond the transom, I used the sander to smooth everything out.  Although I was careful not to sand too heavily on the transom itself, I don't know if I'll be able to varnish it.  It may be too marked up and have too much epoxy showing to use varnish--maybe the whole thing will have to be painted. I also still have a little slot where the bottom piece connects to the transom that I'll have to fill with epoxy.

The transom after I sanded the planks down to be flush with it.

I also sanded the stem and tried to round off the edges.  One of the planks doesn't seem quite right; it sticks up more than the others.  I may need to sand it down in order to put on the fiberglass. 

The entire edge along the bottom needed to be rounded off by sanding.

Filling plank joints with epoxy

February 18, 2011
My order for another bucket of Cell-o-Fill arrived yesterday.  I'm impressed with how fast CLC can get an order to me--I ordered it Monday night and it arrived Thursday morning.   Since the forecast was for temperatures near 50 degrees, figured it would be easy to warm up the cellar and do some more epoxy.  MaryAnn helped me flip the dory again and I pulled out or broke off the remaining wires.  Then I mixed up epoxy using the Cell-o-Fill for thickener, and used a plastic bag with a corner snipped off to make the "pastry bag".   I was able to squeeze out nice lines of epoxy to fill up the joints between the planks.  I also make some really thick epoxy to fill the gaps created by the broken puzzle joints.  I always start out with the intention of cleaning up any stray bits of epoxy, but I always seem to miss some.  Those mistakes mean more sanding.

Filling joints with epoxy

Repairing broken puzzle joints

Trimming fiberglass

February 14, 2011
I trimmed the fiberglass along the top edge of the first plank and then pulled off the masking tape. Although it's not perfect, I'm impressed with the way it came out.  I am a little worried that I have so much wood flour left--I don't really see where I'm going to use all, and I wonder if maybe I didn't put it on thick enough.  When I called CLC, they said it's better to have too much epoxy than not enough. I need to check on whether I should fill in the joint between the transom doubler and the planks.

Trimming the fiberglass with a utility knife.

Fiberglass is in place in the bottom of the inside of the dory and trimmed along the edge between planks one and two.

Fiberglassing the inside

February 13, 2011
One of the difficulties of building the boat alone is missing some important directions.  I read through the booklet and before I do a step I reread the pages that I'm going to be working on.  With all that I missed an important instruction:  "You'll want to saturate all of the fabric in the boat before the epoxy fillets have cured."   Aaaargh!   It was seven pages ahead in the booklet from the step of putting in the fillets.  When I was working on the fillets, I assumed that they needed to cure before putting in the fiberglass--just like the epoxy in the planks.  I cut out the fillet sticks to the dimensions as stated in the manual, and I was careful about cleaning up the excess.  (Although as careful as I am, I still seem to miss some.  I've already learned how important it is to scrape up any extra epoxy--it's much more difficult to sand off later if I miss some.)   Anyway, I now have hardened fillets, and will just need to press ahead.  I don't see another solution.

I cut out fiberglass for each of the compartments and put them in place.  Then, I put a new layer of the "peanut butter" epoxy in the seam in the bow and added the strip of fiberglass. For the other fiberglass, I mixed the epoxy without any thickener and used a plastic putty knife and a bristle brush to wet the epoxy.  It turned out to be a lot trickier than I thought it would be.  The edges of the fiberglass unraveled and it was difficult to get it to lay flat. 

The dory is ready for the fiberglass.

Laying out the fiberglass for each compartment.

The fiberglass is coated in epoxy and the breast hook is in place.

Putting in fillets

February 12, 2011
I worked on putting in the "fillets" in the bow, the transom, on each side of the bulkheads, and along the bottom seam.  I wasn't able to start until later in the morning because the cellar seems to stay around 54 degrees and it took about three hours to get to 60 degrees.   I wasn't sure what  to do about the wires.  On the planks I avoided them, but the directions showed covering them over when putting in the fillets. I don't know how I'm going to get them out later but I don't want the bulkheads to move and it's especially problem at the transom.  I finally got the stickers off the planks--I was so thankful that everything was labeled when I started assembling the planks, but these labels were tough to get off.  I finally used a razor blade and had to be careful not to pull off part of the wood.  I put masking tape along the edge at the bottom of plank 2 to protect it from fiberglass and epoxy.

Getting the labels off was a little tricky--I needed a razor blade.

Masking tape is in place to get ready for the fiberglass.  The sticks are to check to make sure the dory doesn't have  twist.

After mixing epoxy with wood flour and getting it to a peanut butter consistency, I put it into a plastic bag and then cut the corner off.

Using the bag allowed me to get a nice even bead of epoxy into each seam.

Using my fillet stick to smooth out the joint.

Using a plastic putty knife, I smoothed out each seam.  Even though I tried to clean up any excess epoxy, I still missed some spots.

Taking wires out

Oops. The epoxy leaked through here, but fortunately there were not too many of these.

The stitches are out, except for those in the bow, the transom, and the bulkheads.
February 9, 2011
I pulled the staples out of the planks and was pleased that most of them came out easily.  A few were embedded in epoxy and were difficult to get out.  I was also happy that except for a couple places, the epoxy did not leak through the joint.  The "stitches" were tight enough to keep the epoxy on the outside of the hull but in some places I'm going to need to add more epoxy because it was no longer even with the top edge of the plank. It soaked into the joint the way it was supposed to.  And of course I'm going to have to go back over every joint to add epoxy where all the wires were holding it together.

Epoxy in plank joints

Filling each joint with epoxy and trying to avoid the stitches to make it easier to pull them out after the epoxy cures.
February 7, 2011
Started gluing the planks together.  I mixed little cups of epoxy mixed with cell-o-fill and put it into a gallon plastic bag.  By cutting off one corner, I could squeeze the epoxy mix onto the joint between each plank.  The first one needed to be of peanut butter consistency and for the others I needed a thick "sauce".  Most of it went well, but I did have a couple places where the epoxy leaked through. The process was a bit of a mess by the time I was done; getting epoxy into the bag got more difficult as I went along.   I called CLC about the three places where I broke off part of the puzzle joints.  They suggested I glue in the broken pieces that I had, and just build up epoxy to fill in the third one where I'm missing the piece completely. 

Tightening wire "stitches"

February 5, 2011  I reworked the transom to make it fit better and then tightened all the wires on the dory.  I discovered some that I had missed and put them in.  Some I tightened too much and snapped the wires.  Fortunately, I had enough wire left to replace them.  In turning the boat over, I snapped a piece off the edge of a puzzle joint where it was the thinnest (where it had been rabbeted). I have two other places where the then puzzle joint was missing-- I think they arrived that way.  I'm not sure whether to fill it with epoxy or try to glue in a piece of wood. I guess it's a good thing I was planning to paint the bottom. 
Bow wired together

Using pliers to tighten the stitches. Unfortunately, I tightened some too much and they snapped off.

Reworking the transom to make the planks extend beyond the edge of the transom,  and tightening them to get ready for the epoxy.

A couple of the puzzle joints are missing the rabbeted edge as in the #4 plank here.

Friday, February 18, 2011

Stitching complete

January 31, 2011
Because I was still concerned about the main puzzle joint in middle of the bottom of the boat, I called CLC to see what to do about it.  I was told to sand the joint flat to make sure that the fiberglass will lay flat to the bottom.  Sanding will take off the veneer, and I'll have to paint the bottom (they suggested white or light gray) or I could put a new non-slip material on the bottom.  "Called SeaDek, it's nonskid padding that's marine-grade, UV-stable, self-adhesive, and can be cut on our CNC machine. Applied to the bottom of a small boat, it vastly improves your traction AND it's got enough cushioning (5mm) to protect your knees.  The light gray color looks pleasing in all kinds of boats."

February 2, 2011
I spent most of the day "stitching" the planks on to the dory.  This step is really cool because I ended up with something that looks like a dory.  I've only hand tightened the copper wires, and will have to go back over the whole thing to tighten them up, especially fitting the transom into the stern of the boat. I was impressed with how well all the holes for the wires lined up (except for the transom).  The pieces were well labeled and relatively easy to assemble. This part was fun because the dory really looked like a dory very quickly.  The harder part will be working with the epoxy to hold everything together.

The first and second planks are in place.

The dory is stitched together and finally looking like a boat.  The wires need to be tightened and the transom needs to be adjusted, and then I'll be ready to start with the epoxy.

Sanding the gain

January 29, 2011
I continued sanding the joints of the planks 1 and 2 and took the weighs off planks 3 and 4.  The puzzle joints in the planks seem to be fine, and I've been able to sand the epoxy smooth.  I duct taped the hose from the shop vac to the orbital sander--wished I'd figured out this solution a long time ago.  Much of the dust gets sucked into the shop vac.
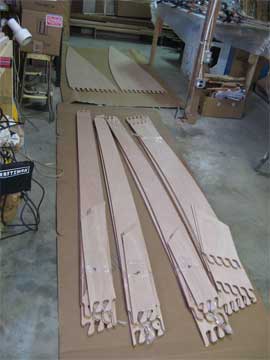
 I used my new rasp to taper the rabbeted edge of planks 2, 3, and 4.  I may need to do a little sanding too because the rasp left tiny grooves. The instructions say the taper or "gain" should be 4" long and taper to almost zero.  I rearranged things a little in the cellar and set up two sawhorses to start "stitching" the dory together.

I have already tapered the "gain" on the planks on the left. The planks on the right were the way they arrived from CLC.
Attached plank 1 to the bottom with the copper wire.  I was impressed with the precision of the way the pieces were cut out.  The holes for the wire were already pre-drilled, and the pieces matched up just the way they were supposed to.

Plank 1 is attached to the bottom with thin copper wires.


I started putting in the bulkheads.  It was a little trickier to put them in than I thought they would be.  I had to use the rasp to round off the tenon to fit in the mortise, and then wired them to the bottom.  I started to wire the bulkhead to plank one but that made it difficult to put in the other bulkheads.  I decided to wait until I had them all wired to the bottom before doing the plank.
Wiring bulkheads to the bottom

Finished puzzle joints

Puzzle joints before gluing
January 28, 2011
I took the weights off the planks and the board I had screwed to the table.  The joints on the planks looked good but the big puzzle joint on the bottom piece came out wrong.  The puzzle pieces were not flat, even though this is the one I was able to screw down.  I looked at the CLC web site but did not see a solution.  I don't know whether to add more epoxy or sand the plywood down to make the joint flat.   I laid out planks 3 and 4 and glued them together and put the weight on them. Because if the warning in the manual, I was careful to put a piece of plastic on top of the joints before I added the weight. I didn't want a 2x8 stuck to the dory plank.