Sunday, July 31, 2011

Shaping boom and tiller extension; Cotton swab test for epoxy

In the afternoon, I shaped the boom by tapering one end and rounding off all the edges.  Using my power planer and router, it didn't take long to do it.  It took me awhile to find a drawing in the manual to show me how much it should taper because it really wasn't spelled out in the text. 

I also shaped the tiller extension, but there wasn't much in the instructions. Fortunately I had some pictures from the Okoume Fest.  Except for the last couple of inches on each end, I just rounded off all the edges and then sanded everything with a fine grit sandpaper.

In addition to the mast, the boom and tiller extension are almost ready to varnish.

I put another coat of epoxy on the daggerboard.  Once I get another coat on, it should be ready to varnish, along with the rudder and spars.  I was glad to find the cotton swab test for epoxy coats in the CLC web site.  I had heard about the test at epoxy workshop at Okoume Fest but because I wasn't sure I remembered it right, I was glad to find it on the site.


The Cotton Swab Test shop tip on CLC web site:
"When is the best time to apply the next coat of resin? It all depends. But if your schedule allows, you will get the strongest bond when the prior coat is not yet cured. But if you do it too early, when the prior coat is still wet, you may float up the fiberglass, or you may not create the build you want. If you wait too long, you will need to sand.
MAS Epoxies suggests a "cotton ball" test. When the epoxy is still wet the cotton ball will not stick. When the resin is too dry, the cotton won't stick. In between this two extremes is a period when the epoxy has stiffened up somewhat but is still tacky. During this period, the resin will grab the cotton fibers and pull on the ball or swab. This is the best time to apply another coat.
While the epoxy is tacky, new coats will not mix in with the prior coat, or get under the fiberglass. If you wait longer it is not a big deal, but you will need to check for blush, and clean it off, and then you will need to sand. As long as you can push your thumb nail (the "rule of thumb") into the dry resin, you do not need a heavy sanding, but a light sanding will promote a better bond."

Lost in the fog

July 31, 2011
I got up early this morning and took the dory out on the Connnecticut River at Herrick's Cove. I'm getting better at backing up the trailer, and this time I put the oars in the oarlocks before I put the dory in the water.  This was a much better way to do it because everything was ready to go once I had the dory in the water.  The morning was cool, the water was still and the fog danced on the water.  I rowed steadily for half an hour upriver, and then took a break, had some water and got out my ipod.  I drifted along while I got the cords untangled and put the ipod in the pocket of my life vest.  Finally ready to row again, I realized that the fog was thicker and I really had no idea which way was back to the landing.  Having no choice I picked a direction and decided I would row for 15 minutes and see if I could see a landmark.  When a concrete structure came into view I realized that I was still going upstream and needed to turn around.  I guess I should put the kayak compass in the dory or bring along a GPS.  It's a good thing I was by myself--it's kind of embarrassing to get lost on such a short outing in a place where there are only two choices, and if I had done nothing I would have eventually just drifted back to my starting place.

Saturday, July 30, 2011

Shaping the daggerboard and mast

July 30, 2011
I finally got motivated to do some more work on the sailing kit.  I had previously glued the daggerboard parts together and today I started shaping it by rounding off the front edge and making a big taper on the back edge.  Following the manual, I drew a line one inch in from the leading edge and three inches in from the back edge, and then used the belt sander to taper the plywood.  I put the daggerboard in the dory to draw a line to show me which part would be in the water and then just stopped the taper when I got to the line.  Okoume is really pretty soft and it didn't take long with the belt sander to do this job.  Then I followed up with the orbital sander to smooth everything out.  I went over everything a second time with fine grit paper, and put the first coat of epoxy on the daggerboard.  I had it hanging from the deck above so that I could do both sides at once.  I was a bit windy today and it kept swinging back and forth but I finally got a coat of epoxy on it.  When I checked it later, I was disappointed to see some runs and it was sticky enough that little black flies were stuck to it like flypaper. Oh well, I was going to sand it anyway before doing another coat.

Sanding the large feathered trailing edge.

Putting the first coat of epoxy on the daggerboard.


I had also previously glued the pieces of the mast together and had the basic shape cut out.  Today I used a power plane and the belt sander to shape it to the template that I had from CLC.  I had to keep carrying it around to the front of the house and trying to fit it into the mast step in the dory.  After three tries I finally had the right shape for the bottom of the mast.  Then I turned my attention to the top of the mast.  I had to get out the template again and draw new lines.  Using the power plane I cut the mast down to the right size, and then finished with the sanders.  Finally I used a router to round off all the edges.  I was surprised how small the top of the mast looks--I hope it holds.  It's nice to have a set of directions to work from; I can trust that someone has worked out all the details and I just need to follow them closely and everything will work OK.

Shaping and rounding off the edges of the mast.

Rowing continued

July 28, 2011
Took the dory out again on the Connecticut River.  This time things went a little more smoothly and I was able to go further up the river in the same amount of time. I went out early before the fog burned off and there was no wind. I discovered that water does splash up out of the daggerboard trunk--I'll need to make something to cover it.  I've also been thinking that I need a big rear view mirror.  This time I was careful to stay away from the river bank because there were some trees and logs stuck in the shallow water that I almost hit the last time I was rowing.  The biggest disadvantage to rowing is not seeing where you are going.  Fortunately there are not many people out on the water.  I saw a couple people fishing from their boat in the mist but I never came that close to them.  However I had some close calls with logs stuck in the water.

Wednesday, July 27, 2011

Learning to row

July 26, 2011
For the past couple weeks, we have been too busy and I haven't had a chance to do anything with the dory.  I keep telling myself to get moving on the sailing kit, but I also want to enjoy the boat now that it can be rowed.

I took the dory down to Herrick's Cove by myself, and got it into the water without incident.  I had put the sliding seat back in and managed to get one sculling oar in place but could not reach the other one from the dock.  I decided to get in in the dory and got the other oar in place and then managed to get far enough away from the dock so that I could use the oars.  Unfortunately, I no sooner got out in the river when I realized that I had left my life vest in the car, and had to go back.  I went through the whole procedure again and finally at long last I was out in the river on my own.  Coordinating, arms, legs and sliding seat took awhile.  I decided to practice each part before trying to put it all together.  For awhile a rowed with just my arms, then I put my feet in the footrests and practiced sliding and keeping my back straight.  I thought I had mastered the movements but then realized that I wasn't turning my wrists.  To get that movement down, I again rowed with just my arms but turned my wrists on the return to let the blades just skim above the water.

Once I had the movements synchronized, it felt great.  I'm not sure how good my form was but it felt great.  I had the same feeling I get on a good day cross country skiing.  When I hit the groove, everything else just falls away and I feel like I'm gliding effortlessly.   For a little while today, everything was moving perfectly and I was just flying across the water.  It gave me a glimpse of how much fun this dory can be.

The sliding seat is definitely worth it.  Sitting up a little higher, and the longer oars give a lot more leverage, and the sliding seat lets me use my whole body to good advantage.  Although I've never been in a sculling boat, I also like the stability of the dory even though I can't go as fast.  Sculling boats look like fragile water bugs to me; one false move and I'd be in the water instead of on top if it. 

Friday, July 8, 2011

Sliding Seat Launch

July 7, 2011
I took off the clamps the repaired rail, and unfortunately the seam is very visible but at least it seems to be holding well. Finally we were ready for the launch of the dory with the sliding seat in place.  Pete and Donna were up and joined us. This time we strapped the dory and ratcheted tight instead of using the bouncy bungee cords.  When we got to Hoyt's Landing in Springfield, we were disappointed to discover that the strap on the bow had slipped off and the boat banged against the post scraping off some of the paint.  Donna reminded me that there is never a last coat when it comes to finishing a boat. Anyway the damage was not bad enough to stop the launch.  This time I backed up the trailer by myself and managed to get it to the water without a lot of do-overs.

Christening the dory for the sliding seat launch.


Matt went out with me as I tried out the sliding seat.  What a difference between rowing with the sliding seat and just regular oars.  I was having a good time with it even though I need to a lot more practice to get all the motions coordinated. It's trickier than it looks, but it's going to be fun to learn.

Learning to row with the sliding seat is trickier than it looks.
Matt shows how it's done.


Pete Wayne and Matt out with the sliding seat.


After Pete and Donna had a turn, we took out the sliding seat, put in the thwart, and brought out the regular oars.  MaryAnn, Becky and the girls arrived and our little flotilla started down the Connecticut River. Matt and I and Molly and Annie were in the dory. MaryAnn and Becky used the kayaks, and Pete and Donna had their canoe.  Matt and I had an awful time trying to coordinate our rowing and kept zigzagging across the river instead of going straight downstream.  Things improved somewhat when Matt asked Molly to sit in the stern seat.  Both she and Annie had been sitting together on the middle thwart.   That seemed to help and of course we had more practice.

At about the four mile mark, we took a break on a sandy beach.  The kids had fun climbing the sand bank but were not thrilled to get back in the boats.  Fortunately we had only a couple miles to go and we pulled out at Herricks Cove.  We had left a car there in order to go back up to Springfield and retrieve the car and trailer.  It was a great afternoon and I was happy to have so much company to the dory's first big trip.

Molly, Becky, Annie, and Matt in dory on the Connecticut River.

Installing Sliding Seat and Making Repairs Already

July 6, 2011
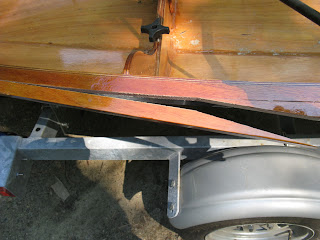
I finished assembling the sliding seat.  I got some Never Seez a few days ago to put on the big nuts that hold the pins that support the oar locks.  I was surprised that there were so many pieces for the oar locks but finally got everything together.  When I brought it out to put it on the dory, I was shocked to discover that one of the scarf joints on the port side rail had separated and that over a foot of the rail was sticking out.  The maiden voyage of the dory was more difficult than I realized.  At least it waited until we got home before coming apart.  I called CLC to see if maybe I should screw it together, but was told to just sand out the joint, tape any parts that I didn't want to get epoxy on, make sure that thickened epoxy covered both surfaces of the joint and clamp it together as I had before.  Epoxy is stronger than screws.

A day after the maiden voyage, I discovered that the rail split along the seam.


Once that repair was made, I attached the slide seat to the supports that I had built.  I drilled a hole through the rail and bolted it to the T-shaped support that gets bolted through the bulkhead.  For bow end I realized that I didn't need to drill through the rail and could use the existing threaded sockets in the bottom of the rail.  I drilled a hole through the okoume plywood that I glued to my cedar support board.  Unfortunately, I drilled in in the wrong spot and had to drill another hole, but finally I got it attached.  I put some furniture pads on the bottom of the cedar board and then put the whole assembly in place.  The final step was to attach the wood supports to the boat with four bolts and wing nuts.  To take it in and out of the boat, I just need these four bolts.

The dory is ready for its sliding seat launch.

Fourth of July Dory Launch

June 30, 2011
I seemed to be jinxed when it comes to working on the middle thwart.  When I tried to put it into the dory, the long foam block was too close to the port side and wouldn't go into place.  I had to cut a little off the block, put some more epoxy on it and then paint it black again. 

July 3, 2011
Finally I was able to get the #2 thwart in place and screwed it down.  To get ready for the launch tomorrow, I also screwed down the #1 thwart, and put the three sets of oar lock sockets on the rails.    I ran out of time to get the leather oar collars on the set of oars that didn't have them.

July 4, 2011
We watched Becky, Annie and Molly run in the Firecracker 5K race in Saxtons River and then stayed for the parade.  After lunch Matt helped me hook up the trailer to the Escape.  Finally we were ready to move the dory. Matt, Becky, Billy and I carried it around the house and put it on the trailer while MaryAnn filmed the big event.  We put bungee cords on it to hold it to the trailer, but later discovered this was not a good thing.  Matt was in his car behind me as we went down to the river. He said it was scary to watch:  the boat bounced separately from the trailer on the rough dirt roads.  Fortunately we did no damage and launched the boat with great ceremony at the Herricks Cove boat launch.   We popped a bottle of sparkling cider and MaryAnn poured some over the bow--no one was breaking any bottles over this boat!


The dory is on the way to the river.


Matt backs the dory into the water.

Getting closer.


Christening the dory.

We had the two sets of oars and Matt and I took it out to try it out together, and then everyone took turns riding in the dory. What a great feeling to be rowing my own boat after spending the last six months building it.  I was very pleased when some of the others at the boat launch came over to check it out. 

Getting ready to row.
Finally synchronized.
More riders
Safely back out of the water.